Thursday, 8 September 2011

What's up next...

I'm in a bit of a lull for projects currently - there's lots of pieces I want to make, but no fabric in the stash, and no tracing has been done.  So I spent all of last Sunday kneeling on the lounge room floor tracing from various BurdaStyle magazines in a bid to progress.  But boy did my knees ache when I finished!  Mental note to self - next time use the table!

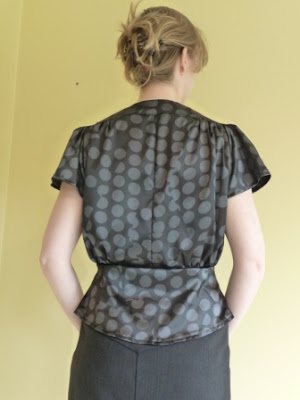
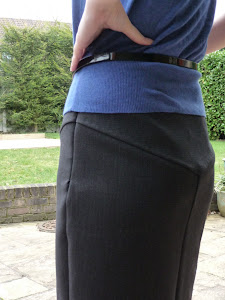
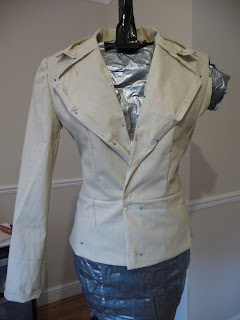
First up will be the 'boat ride' top, 105 from BurdaStyle 07/2011.  I want to make this top in some really lux fabric, so I've made a muslin to trial size and test making the drape.  Well okay yes, basically I just wanted to sew and this was the only fabric I had!  Fit seems pretty good; I just need to shorten the bust darts and lengthen the top a fraction.


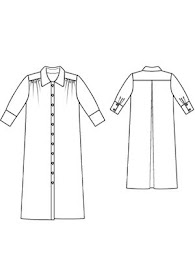
After this I'll be making up 'Pure Power' dress 104 from 05/2011 BurdaStyle.  I want to use some sort of more formal type fabric so I can wear it to work, but I think this pattern could also go well in a casual cotton.
104_techdwg_large

I won't get ahead of myself though, I think these 2 will keep me going for a while at my snail pace of sewing!

Monday, 29 August 2011

Anne Klein dress V1222

Just finished this Vogue Anne Klein design from the Spring 2011 collection.


It's wasn't complicated to make, but there are over 20 pieces to it and a LOT of top stitching, so it was very time consuming.


I took the shoulders up by an inch or so as the bust detail sat below where it should have been.  See the left picture before the adjustment, and the right picture after it.


pic name

pic name

In hindsight, I should have done a proper shoulder adjustment and taken out excess fabric around the armholes, rather than just bringing up the shoulder seams, as there is a bit of fabric bunching going on when it's worn.  I might fix this one day, but for now the dress is definitely still wearable.

Here's the side paneling detail:


See what I mean about a LOT of top stitching!

Thursday, 25 August 2011

BurdaStyle 08/2011

I only just received my August Burda Style magazine, but better late than never I guess.  For me this is probably the best issue since the very first one I purchased.  There's heaps of items I'd make in it.  But as I often find with Burda Style, I love the fabric they use, but can never find it for sale, which is really frustrating!  Like this knit cardigan - it's my favorite piece in the issue, but do you think I can find anyone online who sells knits?  Even Alfatex does not have this fabric against the picture.  Sigh.


Do others have this same problem, or have any suggestions on where to buy from would be great....

Sunday, 17 July 2011

Back into it, with a skirt and shirt

Well, its been a while, I know!  After so much sewing over the autumn and winter, I took a bit of a break to make the most of the brighter weather, and to spend time on other things.  Now that I'm getting back into sewing, I've decided to focus this year on making work wear garments to build up this part of my wardrobe, and to try and co-ordinate the pieces as much as possible.

I've started with a skirt and 2 tops, from the fabrics I bought back in Oz in March.  It's like the finished items will be a belated holiday souvenir! 

The skirt I've made before, Butterick B5249, however this time I made view A, a simple straight skirt.  I'd recommend this pattern to you all, it's quite versatile, and the different views mean it can be made over and over again.

The first top to go with this skirt is a shirt in New Look 6407.  I'm making view D.  The fabric is a silk poly and was a complete nightmare to cut out; real slippery.  I had to cut each piece from single layer, it took absolute ages to do as it kept moving about.  Luckily though, sewing the fabric was pain free.  I did french seams on all except the armholes, which I over locked due to the curve.  To set in the sleeves I used my usual process of spreading the ease manually with pins rather than by gathering.  And I decided not to go for a bow and cut-out on the sleeve, but to instead just have a band which I decorated with an overlap and button.  The sizing on this pattern came up small - I cut a 12 which fit my measurements, but I really could have done a 14.  This picture doesn't have the hem and buttons sewn on yet, but you still get the idea!


The 2nd top will be a self drafted pattern and is still in progress, so I'll save that for a later post.

Saturday, 26 March 2011

BurdaStyle 01/2011 102 Blouse

I'm in love with this blouse!  But it was a hard slog!  I took a lot of advice from long time sewer of BurdaStyle, Sharon, who wrote a few great blogs on the fun-and-games she had making it, and I'm sure this advice was the reason mine turned out so well - thanks Sharon! :)

Here's the technical drawing:
And now my version (paired with my BurdaStyle 113 skirt):


5249 cover

5249 view B

I made Sharon's suggested construction alterations, and also made a few extras of my own.  They were:

* Omitted the button loops and replaced with normal button holes (mental note to self - practice stitching buttonholes before next project!).

* Removed 5/8" from each CF piece as such an overlap wasn't necessary due to the button change above.  However, I probably should also have increased the slope of the neck V as it's quite a conservative height now (a little too conservative perhaps...)

* Changed the front dart to a peplum and added 5/8" to the length to compensate.

* Brought the front top gathers closer to the CF.

There were a lot of difficult parts in the construction of this top - the square set sleeves, the yoke and the buttonholes - the first two were difficult because the instructions were absolute rubbish, the later was difficult because I was rubbish at it!

Now I'm certainly no pattern instruction writer, but hopefully these construction tips below will be more helpful than the BurdaStyle ones!:

For the sleeves - finish vertical stitch line 5/8" below the corner.  Clip the front or back piece (not the sleeve piece) from corner to end of stitch line.   When doing the horizontal seam, pull the fabric to the side, and ensure your stitch lines meet in a perfect right angle, otherwise you'll get an unfortunate pinch in the fabric at the corner of the sleeve.

For the front facing - cut a little longer than the front piece at the top so it's easier to finish.

For the yoke - when joining to the blouse, ensure the front neck edge of the yoke extends 5/8" past front/facing seam so that when the bottom yoke is sewn on the finished edges all meet.

Did I mention that I love it?!

Sunday, 6 March 2011

6848 holiday pic

I can feel the onset of post holiday blues already!  Snapped this pic of me wearing the 6848 whilst in a winery in Perth - it was pretty hot this day so excuse the dodgy hat! 


And of course I went fabric shopping and picked up some nice co-ordinating fabrics for some more projects - once I've done everything else on my list first, promise!  

Tuesday, 15 February 2011

Simplicity 6848 - Summer holiday dress!

This will be my last post for a few weeks as I'm off on a holiday - yippee, SUN here I come! :)  To celebrate the excitement, I finished off this little summer dress, Simplicity 6848.


I made view C in a cotton fabric which I purchased from Mood whilst on holiday in New York some time ago.  I've taken the pictures on my dress form as there was no way I was getting dressed for a summer day whilst here in the chilly UK!  I'll try take a pic of me in it whilst on holiday and post for you all to see.

A close up of the bodice which has a bit of gathering:


I'd probably recommend that if you're a bit hippy, that you cut a more prominent A-line than the pattern piece.  It currently just fits over my hips and I'd probably would have liked a bit more room.  Even so this is a simple quick dress to sew.

Saturday, 12 February 2011

Burda 7576 Jacket - Setting in the sleeves

I've always had difficulty setting in sleeves.  They always seem to look a little unprofessional, a bit too rustic.  So obviously I was a little nervous when I got around to doing them for the 7576 jacket.  My main problem has always been there's a pucker, or a gather that's not evenly distributed, no matter how hard I try.  This is the sleeve of the McCalls M5759 jacket I made, notice the problem?


I was told recently of another method to set sleeves in which is different to how pattern instructions and all my books said to do it, and I decided to give it a go for this jacket.  I'm thinking the results are pretty good....

Do not sew the 2 gather lines as per pattern instructions.  Instead, it's all about pinning to distribute all the ease evenly.   First match up all markings and pin together - I had 4 markings for this jacket making 4 little sections.  Next, working on one section at a time, find the middle of each fabric piece and pin mark it, then match the 2 pins together and pin the sleeve to jacket.  Then do the same again and again until all ease is distributed.  Then move onto the next section until all are done.  Your pins should be close together, about 1/8 inch apart in areas with a lot of ease.  This is what it'll look like once pinned:


You can then hand baste it all together and take out your pins, or like me whose hand basting isn't good enough, just sew the sleeve with all the pins in - obviously sewing really slowly so you can whip them out if the needle looks like it's going to hit.  This is my sewn sleeve - I'm thinking is the cleanest one I've done, big smile!  Compare it to the M5759 one above.

This will definately be my method from now on.

Sunday, 6 February 2011

BurdaStyle 01/2011 - 113 Skirt

My first Burdastyle magazine pattern is completed!  Overall I'm pretty happy with this skirt, although I had a few little issues with the construction. 


2440 front


2440

2440 front

2440

The fabric I used came from a sample rack so I'm not entirely sure of its contents, however I think it must be lycra based as it has a bit of stretch - this is a good thing as this skirt is quite close fitting! 

The yokes:  Getting a nice clean V shape on the yokes was difficult and I didn't quite get there unfortunately!  You can see from the picture that the back V dose not sit so flush. 

The godet:  I loved this element of the skirt in the magazine picture, but unfortunately this part just did not quite work on mine.  I think this was because of 2 factors -
  • I had taken 2 inches off the length when cutting out to get it to my desired length, however I forgot to adjust the the godet seam mark on the pattern up by 2 inches also.   This meant that my godet was far too small;
  • The fabric doesn't have enough movement in it so the godet stuck out rather than fall softly into a fold.  Looks more than a little odd so off it came!

The tailored jacket is still in progress and coming along slowly, I should have a post soon as an update.

Saturday, 29 January 2011

Burda 7576 - Jacket, Uppercollar

Not much happening in my sewing world this week unfortunately, I've only managed to work on joining the uppercollar to the front facing.  Why is it that instruction writers always seem to go light on words in the really tricky areas of the construction?  Is it because for them it's an easy step, or, perhaps they're just as confused and keep it brief so they don't get found out!  Anyhow, it was tricky and fiddly getting a nice neat corner on the join - it was a 3rd time lucky situation!

Burda 7576

Burda 7576

Burda 7576

Feels like progress has been slow after such a good start, but I know that once the collar is done, the rest should come together quite quickly....

Sunday, 23 January 2011

Next Projects...

This weekend I headed up north to Norwich.  It was a lovely town, a lot of that old-world English charm, and good shopping too!  There's something quite nice about wandering around shops on old cobbled streets and through arcades. 

One of my main reasons for the visit here was a fabric shop - Anglian Fashion Fabrics.  I always have to visit fabric shops whenever I go somewhere new, it's a slight obsession of mine!  This shop though had a wide selection of fabrics, and I was quite impressed with the seasonality of them - for instance they had several shades of camel wool blend fabric for coats which was big this winter - but my local shops just did not carry any.  They also had racks of sample fabrics from suppliers for sale, buy now or miss out stuff, these were at good prices as well.  Anyhow here's my picks:


From the left, the grey will be a dress from this new seasons Vogue, V1222, from the Anne Klein New York range. 


The next 3 will be for designs from the BurdaStyle 01/2011 magazine - 102 blouse in the black and grey spotted satin, 113 skirt in the black, and the 108 dress in the printed jersey.


01/2011 102

01/2011 113

01/2011 108


Tuesday, 18 January 2011

Burda Style magazine patterns

Whow!  Trying to copy the Burda Style pattern pieces is a bit of a struggle isn't it?  It's like a maze of lines!

To save me the daunting task of tracing them out, I've photocopied the bits that I need (I think!), but even just identifying the right lines to cut is hard!  I had read they were difficult, but hadn't quite appreciated just how much.  Check out this example:


I'm going to need my concentration head on for this one that's for sure!

Saturday, 15 January 2011

Burda 7576 - Jacket, interfacing

I'm interlining my Burda suit jacket with hair canvas following the guidance in my tailoring book.  This book describes 3 methods - custom, machine and fusible.  Originally I wanted to follow the machine method to speed up the process - I didn't want to get bored with endless mindless hand stitching - however some of the steps for machine method are a little light on detail.  So now I'm doing a combination of methods to incorporate the custom method too. 

First I worked on the undercollar.  For this I used the machine method.  I needed to cut the interfacing on the bias, and being a newbie to bias cutting, wasn't sure how to do it!  So all I did was cut it on a 45 degree angle to the selvage using my mat grid lines as the guide.


When stitching interfacing onto the fabric, the machine method stitches will show through to the jacket fabric.  It's only a problem if you put the collar up, but as I won't be I'm okay with this. 


Then the collar needs to be wrapped around a tailors ham and steamed to set in the roll.  Here I wasn't sure how long I needed to steam it for, and how I could tell if it was done enough, so I gave it a good blast for about 5 minutes.  Now only time will tell I guess .  Looks cute hey!


When I moved onto the jacket front, I switched to the custom method.  I ignored the pattern's front interfacing piece and instead used the jacket front piece (& slightly altered it to take a chunk out from the inner side). 

There was a fair bit of hand sewing to be done - yawn.  However, strangely I actually found it really satisfying work!  I learnt new stitches - catch stitch, padstitch and uneven permanent basting - and it was all kind of relaxing.  Perhaps I drank too many camonile teas....     


I steamed the lapel on the roll line as well to set it in. 

For the back interfacing, I used the back pattern piece folded up to give a bit more support across my shoulders. 


That's an awful lot for one day!  This has so far been a really enjoyable project which was much needed after my last one.

Sunday, 9 January 2011

Simplicity 2440 - Part 5 - Time for a break!

After the disaster I had recently with my first attempt to cut out the skirt for this pattern, the extra fabric has now arrived in the mail, and I set about re-cutting.  

What I'm trying to do is eliminate the pattern gatherings and just have a simple A-line skirt.  As the skirt waist pattern pieces are wider to accommodate for the gathers, I need to reduce them down.  The first time I attempted this, I just halved my waist measurement, marked that on the pattern, and drew a new line down from there.  This was obviously a school-boy error, as my hips are bigger than my waist, and as such there was not enough material to fit around them.  Doh!  All part of the learning experience right?!  This time however, I followed instructions for making a skirt block and worked out where to mark the new lines.  This was much more successful!  I was probably a bit too generous with the ease measurements though - but better to have too much material than not enough!  Anyhow, here it is so far:


I still need to adjust the side seams, finish the lining, do the hem and fix the shoulder straps in place. 

Gosh, so much to do still!  I really think this dress and me are needing a break from each other for a while.  It's been a rocky relationship so far, and some time apart will allow me to start loving it again so that I can give it the attention it deserves....

Previous posts on 2440 can be viewed here, here, here and here!

Thursday, 6 January 2011

Burda Style magazine 01/2011

I have just discovered Burda Style magazine and I'm soooo excited that I did!  I purchased the January issue, and absolutely love about 10 patterns in there, and all those patterns for just £5! 

My favorite item is the cover dress (dress 108).  The pattern sketch of this dress is actually really bland, like a sack really, but once made up and with a belt, I think it's unreal.


My only problem now is trying to get hold of the fabric used in the magazine.  I've discovered a site which sells a range of the fabrics used in the Burda magazines - it's in German but Google Chrome can translate the pages easily - http://www.alfatex.de/epages/alfatex.sf/de_DE/?ObjectPath=/Shops/alfatex - but they do not have this particular fabric!  Any ideas from readers will be greatly welcomed!

Sunday, 2 January 2011

Burda 7576 - Jacket, muslin

I've encountered a problem with the dress.  It's now on hold until more material arrives in the post!  I seem to have miss-calculated a pattern alteration and cut the skirt front piece too small, disaster!  However, crisis was averted as luckily the fabric store had some left - 75cm left to be precise, but I only need 64cms luckily!

And so I've moved onto my next project in the meantime - the suit jacket to match the skirt previously made.  I'm using a Burda pattern for the first time - Burda 7576:

I want this to be a proper tailored jacket, and so am using a book to help me - Tailoring, a step by step guide to creating beautiful customised garments.  I'm going to use their machine method which combines many of the hand tailoring techniques with the sewing machine to make it faster.

Today I made the muslin.  Following the book, I cut the front, side, back, under collar and sleeve pieces only and constructed it.  I'm pretty happy so far; sizing is good (for once), darts and waist line in right place and lapel seems to sit well. 


I need to make 2 adjustments only - first is to mark on the under collar roll line (Burda seem to have omitted this from the pattern) and secondly, eliminate the back peplum gathering and replace it with a pleat, which I think looks less homemade, what do you think?


7576 trial

7576