Here's the technical drawing:
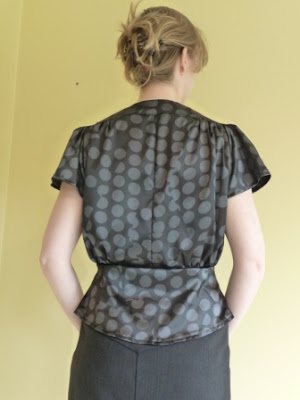
And now my version (paired with my BurdaStyle 113 skirt):
 |  |
I made Sharon's suggested construction alterations, and also made a few extras of my own. They were:
* Omitted the button loops and replaced with normal button holes (mental note to self - practice stitching buttonholes before next project!).
* Removed 5/8" from each CF piece as such an overlap wasn't necessary due to the button change above. However, I probably should also have increased the slope of the neck V as it's quite a conservative height now (a little too conservative perhaps...)
* Changed the front dart to a peplum and added 5/8" to the length to compensate.
* Brought the front top gathers closer to the CF.
There were a lot of difficult parts in the construction of this top - the square set sleeves, the yoke and the buttonholes - the first two were difficult because the instructions were absolute rubbish, the later was difficult because I was rubbish at it!
Now I'm certainly no pattern instruction writer, but hopefully these construction tips below will be more helpful than the BurdaStyle ones!:
For the sleeves - finish vertical stitch line 5/8" below the corner. Clip the front or back piece (not the sleeve piece) from corner to end of stitch line. When doing the horizontal seam, pull the fabric to the side, and ensure your stitch lines meet in a perfect right angle, otherwise you'll get an unfortunate pinch in the fabric at the corner of the sleeve.
For the front facing - cut a little longer than the front piece at the top so it's easier to finish.
For the yoke - when joining to the blouse, ensure the front neck edge of the yoke extends 5/8" past front/facing seam so that when the bottom yoke is sewn on the finished edges all meet.
Did I mention that I love it?!

Yay! It looks great! And I just got fabric for this top. Your tips are fantastic and will definitely be using them. I think the weather here is too warm for sewing the skirt (I would love it in a wool), but I am going to try to tackle that top! As soon as I can get that swing dress done... :)
ReplyDeleteI love it also !!! I cut this one out and it is just too big aaargh !!! I really wanted to make it too .
ReplyDeleteThanks Lisa! You could always just do more gathers if it's a little big, that will size it down.
ReplyDeleteLove it! You did a fantastic job, and I really like the polka dots. Thanks for the construction tips, as this is a top I've got on my radar for spring.
ReplyDeleteThis looks realy lovely. It looks a much simpler blouse to make than it obviously is. I think it would look great made with the buttons as per the pattern However, the fabric would need to be a much softer fabric such as a voile or similar.
ReplyDeleteHi ptimberl, I think it should be simple to make, but with no instructions I had to think everything through. It was more hard work on the brain than on sewing!
ReplyDeleteMrs C the thing was it seemed so big on the neck area . When I tissue fitted it the center front line was way off . I may come back to it if I have time to alter the pattern to death . Your version is so pretty .
ReplyDeleteThis is so funny- I was wearing this blouse at work today when I came across your review on Pattern Review. I clicked through to your blog, and I am so jealous- your blouse is gorgeous and I like it so much better than mine! Making the peplum a seperate piece worked beautifully. The blouse looks fantastic on you! Darn it, it makes me want to give this pattern another go and I was so happy to be done with it!
ReplyDelete